I still remember the first time I tried to install a dimmer switch in my tiny coastal cottage – it was a disaster. I had heard it was a straightforward process, but as I stood there, surrounded by wires and confusion, I realized that the myth of simplicity was just that – a myth. The truth is, how to install a dimmer switch isn’t rocket science, but it does require some know-how and patience. As someone who’s passionate about DIY projects and uncovering hidden gems, I’m excited to share my experience and guide you through this process.
In this article, I’ll give you the lowdown on dimmer switches, sharing my personal tips and tricks for a successful installation. You’ll learn how to navigate the basics, from choosing the right dimmer switch to avoiding common pitfalls. My goal is to provide you with honest, no-hype advice that will empower you to take control of your lighting and create the ambiance you desire. By the end of this guide, you’ll be confident in your ability to install a dimmer switch like a pro, and you’ll be one step closer to transforming your space into a warm and inviting oasis.
Table of Contents
- Guide Overview: What You'll Need
- Step-by-Step Instructions
- Flickering Tales Installing Dimmer Switches
- Dimming to Perfection: 5 Essential Tips for a Seamless Installation
- Dimmer Switch Installation Essentials
- Illuminating Insights
- Shining Bright: A Conclusion to Your Dimmer Switch Journey
- Frequently Asked Questions
Guide Overview: What You'll Need
Total Time: 1 hour 30 minutes
Estimated Cost: $20 – $40
Difficulty Level: Intermediate
Tools Required
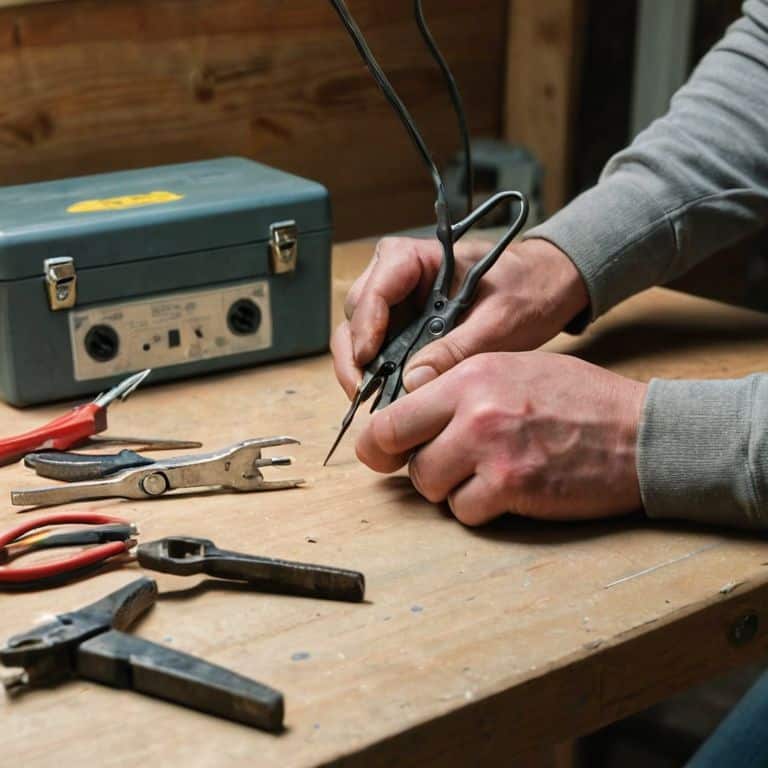
- Needle-nose Pliers (for gripping small wires)
- Wire Strippers (for stripping 6 inches of wire insulation)
- Screwdriver (flathead and Phillips)
- Voltage Tester (for safety purposes)
Supplies & Materials
- Dimmer Switch (compatible with your lighting system)
- Dimmer Switch Plate (to match your existing decor)
- 15-amp Wire Nuts (for connecting wires)
- Electrical Tape (for insulating wires)
Step-by-Step Instructions
- 1. First, let’s get started with the basics – safety first. Make sure you’ve turned off the power to the circuit at the main electrical panel. This is a crucial step to avoid any electric shocks or injuries. Verify that the power is off using a non-contact voltage tester.
- 2. Next, remove the old light switch cover plate to access the wires. You’ll typically find two or three wires connected to the old switch – a black (hot) wire, a white (neutral) wire, and possibly a copper (ground) wire. Take note of the wire colors and their connections, as you’ll need to replicate this setup with your new dimmer switch. Labeling the wires can be helpful to keep track of them.
- 3. Now, it’s time to prepare your new dimmer switch. Take it out of the packaging and familiarize yourself with its components. You should see the same wire connections as your old switch – black, white, and possibly copper. Some dimmer switches may also have an additional wire for smart home integration or other features, so be sure to consult your user manual.
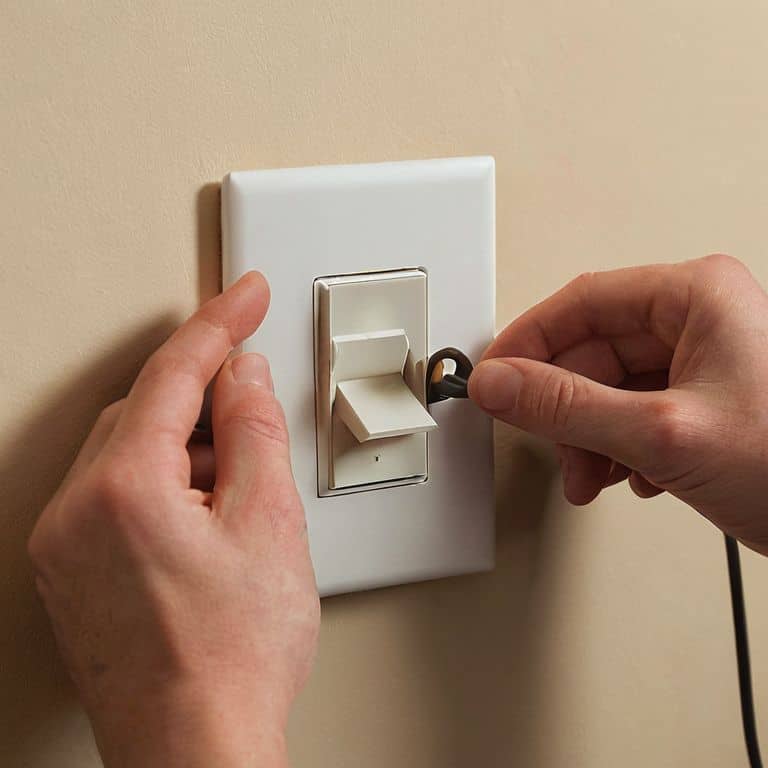
- 4. Begin connecting the wires to your new dimmer switch. Start with the black (hot) wire, as this is usually the most critical connection. Attach it to the corresponding terminal on the dimmer switch, making sure it’s securely fastened. Then, move on to the white (neutral) wire and connect it to its respective terminal. If you have a copper (ground) wire, connect it to the grounding terminal on the dimmer switch.
- 5. With the wires connected, it’s time to mount the dimmer switch to the wall. Align it with the old switch’s screw holes and screw it into place. Make sure it’s level and securely fastened to the wall to avoid any loose connections.
- 6. Turn the power back on at the main electrical panel and test your new dimmer switch. Start with the lowest dimming setting and gradually increase the brightness to ensure it’s working smoothly and consistently. If you notice any flickering or issues, you may need to adjust the wire connections or consult the user manual.
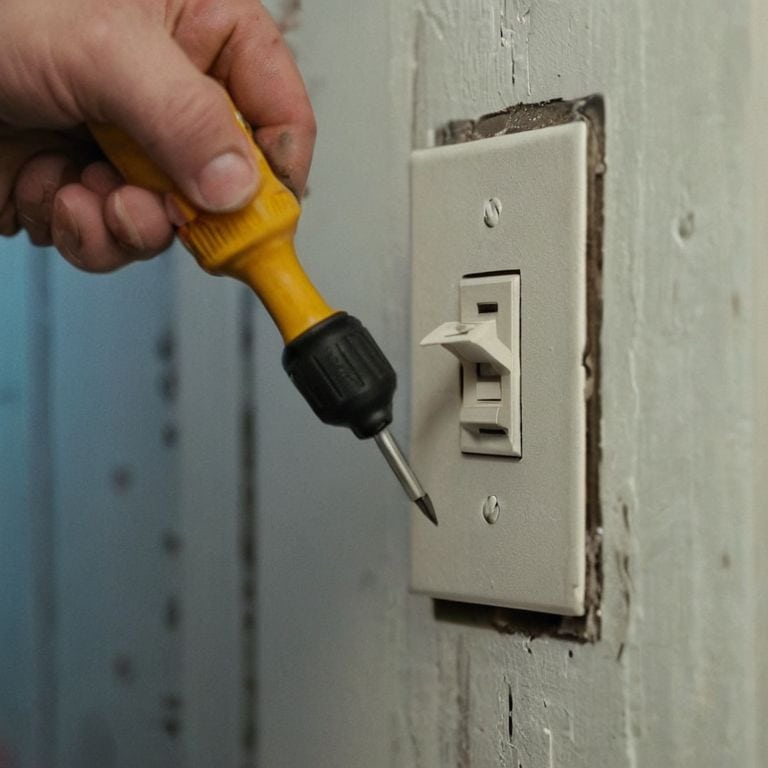
- 7. Finally, replace the switch cover plate and tidy up any loose wires or debris. Take a step back and admire your handiwork – you’ve successfully installed a dimmer switch and can now enjoy the ambiance and energy efficiency it provides.
Flickering Tales Installing Dimmer Switches
As I reflected on my own experiences with installing dimmer switches, I realized that having a dimmer switch wiring diagram can be incredibly helpful. It’s like having a treasure map to guide you through the process, ensuring that you avoid any potential pitfalls. I’ve found that taking the time to study the diagram and understand the wiring setup can make all the difference in a successful installation.
When it comes to choosing the right dimmer switch for your home, there are several types of dimmer switches to consider. From traditional rotary dimmers to modern smart dimmers, each has its own unique characteristics and benefits. For instance, some dimmer switches can be installed without a neutral wire, making them a great option for older homes. However, it’s essential to weigh the pros and cons of dimmer switch vs smart lighting to determine which one best suits your needs.
In my treasure hunting adventures at flea markets, I’ve come across some amazing vintage lighting fixtures that can be paired with dimmer switches. But, I’ve also learned about the importance of dimmer switch safety precautions. It’s crucial to turn off the power to the circuit before starting the installation and to use a voltage tester to ensure your safety. By being mindful of these precautions and taking your time, you can enjoy the ambiance and energy efficiency that dimmer switches have to offer.
Decoding Dimmer Switch Wiring Diagrams
Decoding Dimmer Switch Wiring Diagrams
As I delved into the world of dimmer switches, I found that understanding the wiring diagrams was like uncovering a treasure map. At first, the symbols and lines seemed like a foreign language, but with a closer look, I discovered a systematic approach to deciphering them. It’s essential to identify the wires – line, load, and ground – and understand how they interact with the dimmer switch.
By studying the diagrams, I realized that each component plays a crucial role in the overall functionality. The line wire, typically black or red, carries the power from the electrical panel, while the load wire, often black, connects to the light fixture. The ground wire, usually copper or green, ensures safety by providing a path to ground. With this knowledge, installing a dimmer switch becomes a straightforward process, and the wiring diagram transforms from a puzzling code to a clear roadmap for success.
Types of Dimmer Switches for Home Charm
As I wandered through a quaint flea market last weekend, I stumbled upon an assortment of vintage dimmer switches that sparked my curiosity. It got me thinking about the various types of dimmer switches that can add a touch of home charm. From traditional rotary dimmers to modern touch-screen models, the options are endless. I’ve come across sleek slide dimmers, sophisticated smart dimmers, and even customizable dimmers that can be tailored to fit any home’s unique style.
Each type has its own unique character, waiting to be discovered and woven into the narrative of your space. I’ve collected postcards from homes that feature these diverse dimmers, and the stories they tell are truly captivating. Whether you’re aiming for a rustic, cozy ambiance or a sleek, modern glow, the right dimmer switch can make all the difference.
Dimming to Perfection: 5 Essential Tips for a Seamless Installation
- Illuminate Your Space: Before you start, ensure you’ve turned off the power to the circuit at the main electrical panel to avoid any shocks or injuries
- Switch it Up: Choose the right dimmer switch for your needs, considering factors like single-pole or three-way, and whether you need smart home integration or a simple, classic design
- Wire Wizardry: Familiarize yourself with the wiring diagram, and don’t hesitate to consult a pro if you’re unsure – it’s better to be safe than sorry when dealing with electricity
- Dimmer Delights: Consider the ambiance you want to create, from soft, warm glows to vibrant, energetic atmospheres, and pick a dimmer switch that can deliver your desired effect
- Test the Waters: Once installed, flip the switch and test your dimmer to ensure it’s working smoothly, and don’t forget to adjust the brightness to your heart’s content – after all, that’s what dimming is all about
Dimmer Switch Installation Essentials
Always turn off the power to the circuit at the main electrical panel before starting the installation to ensure safety
Choose the right type of dimmer switch for your needs, considering factors such as compatibility with your lighting fixtures and the desired level of control
Take your time deciphering the wiring diagram, and don’t hesitate to consult a professional if you’re unsure about any part of the process to avoid potential hazards
Illuminating Insights
As I’ve learned from my treasure hunts at flea markets, the right lighting can transform a space into a treasure trove of ambiance and warmth, and installing a dimmer switch is the first step to uncovering that hidden charm, one flicker at a time.
Vera Kump
Shining Bright: A Conclusion to Your Dimmer Switch Journey
As we wrap up our adventure in installing dimmer switches, let’s recap the key takeaways: understanding your wiring diagram, choosing the right type of dimmer switch for your space, and following those step-by-step instructions to bring your vision to life. It’s been a journey of uncovering the hidden charm in the unlikeliest of places – your light switches. With these skills, you’re not just a homeowner, you’re a curator of ambiance, a weaver of warm and inviting atmospheres.
So, as you flip the switch and watch your space transform, remember that the power is in your hands. Don’t be afraid to experiment and try new things, to push the boundaries of what you thought was possible with lighting. Your home, your rules, and with these newfound skills, you’re ready to illuminate your world in ways you never thought imaginable. Happy decorating, and until next time, stay bright!
Frequently Asked Questions
What are the most common mistakes to avoid when installing a dimmer switch?
When installing a dimmer switch, beware of common pitfalls like incorrect wiring, overpowering the switch, and neglecting to turn off the power supply – trust me, I’ve seen my fair share of flickering fiascos at flea markets and in vintage homes, and I’m here to guide you through it!
Can I install a dimmer switch myself or do I need to hire a professional electrician?
Absolutely, you can install a dimmer switch yourself with a bit of patience and the right guidance. While it’s always a good idea to consult a pro if you’re unsure, many dimmer switches come with straightforward instructions that make DIY installation a breeze. Just remember to turn off the power to the circuit before you start!
How do I know which type of dimmer switch is compatible with my home's existing lighting system?
When choosing a dimmer switch, consider your lighting system’s voltage, wattage, and bulb type. Check your existing switch or lighting fixture for these details. You can also refer to your home’s electrical blueprint or consult with an electrician to ensure compatibility. I like to think of it as treasure hunting – digging through the details to find the perfect fit!