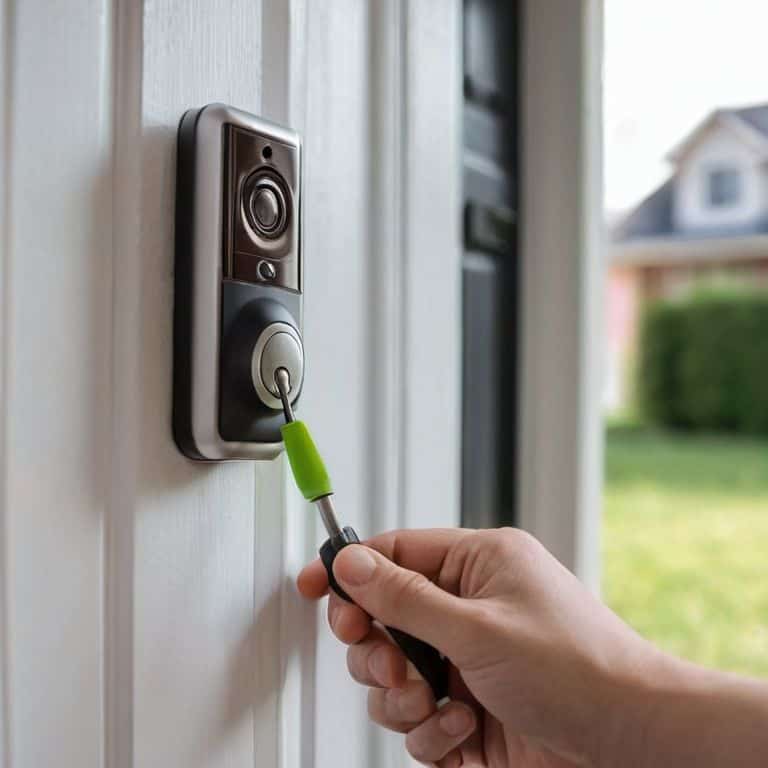
As I sit in my Emily Dickinson study, surrounded by vintage teapots and the soft glow of afternoon light, I am reminded of the countless times I’ve heard friends and family members struggle with the idea of how to install a smart doorbell. The common myth that it’s a daunting, overly complex task has led many to shy away from giving their homes a much-needed dose of modern magic. But the truth is, installing a smart doorbell can be a surprisingly straightforward process, one that can add a touch of whimsical wonder to your entryway.
In this article, I promise to guide you through the simple, step-by-step process of how to install a smart doorbell, sharing my own experiences and practical tips along the way. You’ll learn how to choose the right smart doorbell for your home, how to prepare your space for installation, and how to troubleshoot any common issues that may arise. My goal is to empower you with the knowledge and confidence to transform your entryway into a warm and welcoming space that sets the tone for the rest of your home. So, let’s get started on this journey together, shall we?
Table of Contents
- Guide Overview: What You'll Need
- Step-by-Step Instructions
- Whispers at the Door
- Powering Enchantment Smart Doorbell Power Requirements
- Wireless Wonders Smart Doorbell Camera Installation
- Doorway Delights: 5 Enchanting Tips for a Seamless Smart Doorbell Installation
- Timeless Treasures: 3 Key Takeaways for a Magical Smart Doorbell Installation
- A Door to Enchantment
- A Warm Welcome: Conclusion
- Frequently Asked Questions
Guide Overview: What You'll Need
Total Time: 1 hour 45 minutes
Estimated Cost: $50 – $100
Difficulty Level: Intermediate
Tools Required
- Screwdriver (flathead and Phillips)
- Drill (with 1/8 inch drill bit)
- Level (to ensure proper alignment)
- Pliers (for wire management)
- Wire strippers (for exposing wire ends)
Supplies & Materials
- Smart doorbell device
- Mounting screws (provided with smart doorbell)
- Wall anchors (for drywall or wood surfaces)
- Wire connectors (for connecting doorbell wires)
- Weather-resistant sealant (for outdoor installation)
Step-by-Step Instructions
- 1. First, let’s start by preparing our tools and materials, shall we? We’ll need a screwdriver, a drill, and the smart doorbell kit itself, which usually includes a doorbell unit, a mounting bracket, and some screws. It’s essential to read the manufacturer’s instructions before we begin, as different models might have slightly varying installation requirements.
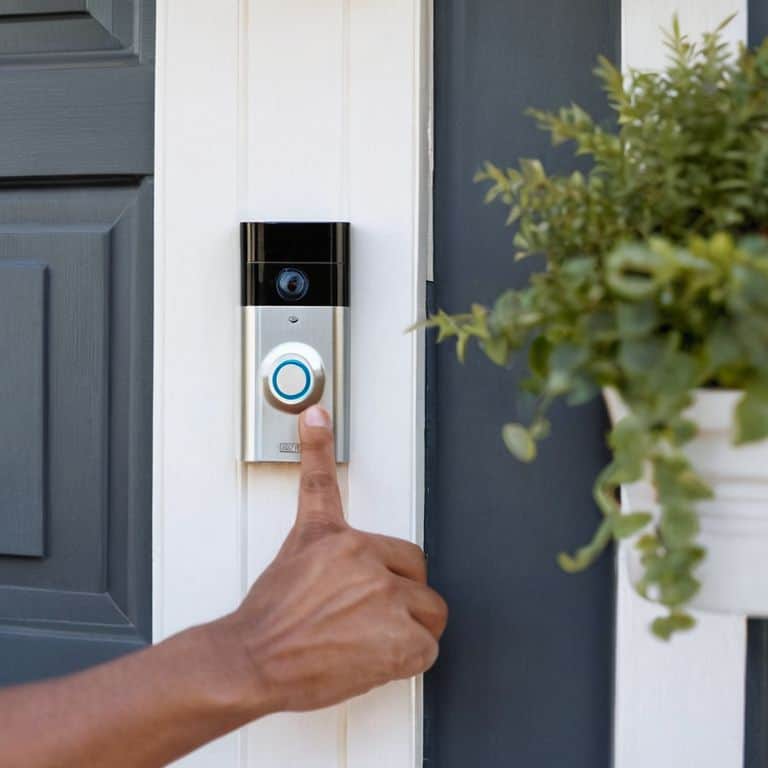
- 2. Next, we need to choose the perfect spot for our smart doorbell. Consider the viewing angle and ensure it captures the entire entryway. Typically, this means placing it at a height that allows it to see visitors from the waist up. Also, think about the power source; if your smart doorbell is wireless, you won’t need to worry about being near a power outlet, but if it’s wired, you’ll need to plan accordingly.
- 3. Now, let’s prepare the area where the doorbell will be mounted. If you’re replacing an old doorbell, you’ll need to remove it first. Use your screwdriver to take out the screws holding the old doorbell in place. Then, gently pull it away from the wall. If there are any old wires, carefully disconnect them. This step is all about creating a clean slate for your new smart doorbell.
- 4. The mounting bracket usually comes with the smart doorbell kit, and it’s designed to fit snugly against your wall. Hold the bracket against the wall where you’ve decided to place your doorbell, ensuring it’s level. Then, use your pencil to mark the spot where the screws will go. This is a crucial step because you want your doorbell to be perfectly aligned.
- 5. Using your drill, make pilot holes in the marks you’ve just made. These holes should be slightly smaller than the screws provided with the mounting bracket. Then, take your screwdriver and screw the mounting bracket into place. Make sure it’s securely fastened to the wall. The bracket should feel sturdy and not move when you apply a bit of pressure.
- 6. Now, it’s time to attach the smart doorbell to the mounting bracket. Most models click into place, but refer to your specific model’s instructions for the exact method. Once it’s securely attached, test the doorbell to ensure it’s working properly. This includes checking the video feed if it has a camera, testing the motion detection, and ensuring you receive notifications on your device.
- 7. Finally, let’s talk about final adjustments. Double-check that your smart doorbell is working as expected, and make any necessary adjustments to the position or settings. You might need to tweak the motion detection sensitivity or adjust the camera’s field of view. Also, take a moment to clean up any debris from the installation process and admire your handiwork. Your new smart doorbell is now ready to welcome visitors and add a touch of modern magic to your entryway.
Whispers at the Door
As I sit in my Emily Brontë room, surrounded by the soothing colors of the moors, I ponder the nuances of a smart doorbell. To truly enhance your smart home security, consider integrating your new doorbell with existing systems. This seamless merge can create a robust network, providing an added layer of protection and peace of mind.
When it comes to the nitty-gritty of wireless doorbell camera installation, it’s essential to consult your device’s manual for specific instructions. However, a general rule of thumb is to ensure a stable internet connection and sufficient power supply. Smart doorbell power requirements can vary, so be sure to check your device’s specifications to avoid any potential issues.
In my Alice in Wonderland room, I love to display my collection of vintage teapots, each one telling a unique story. Similarly, your smart doorbell can tell a story of its own, with features like motion detection and video recording. To get the most out of your device, explore diy smart doorbell troubleshooting tips and tricks, and don’t hesitate to reach out to the manufacturer if you encounter any issues. By doing so, you’ll be able to extend your smart doorbell’s battery life and enjoy uninterrupted service.
Powering Enchantment Smart Doorbell Power Requirements
As I sat in my “Elizabeth Bennet” sitting room, surrounded by vintage teapots and the warm glow of afternoon sunlight, I pondered the magic of smart doorbells. To bring this modern enchantment to life, it’s essential to consider the power requirements. Most smart doorbells are battery-powered, but some models may need to be hardwired, especially if you’re looking to integrate them with your existing doorbell chime. I must admit, I find the idea of blending old and new quite charming.
When it comes to powering your smart doorbell, be sure to check the manufacturer’s guidelines for specific voltage and power needs. This will ensure a seamless and safe installation process, allowing you to focus on the more whimsical aspects of your smart doorbell, like customizing notification sounds or adjusting motion detection settings. With the right power in place, your smart doorbell will be ready to welcome visitors and add a touch of modern wonder to your entryway.
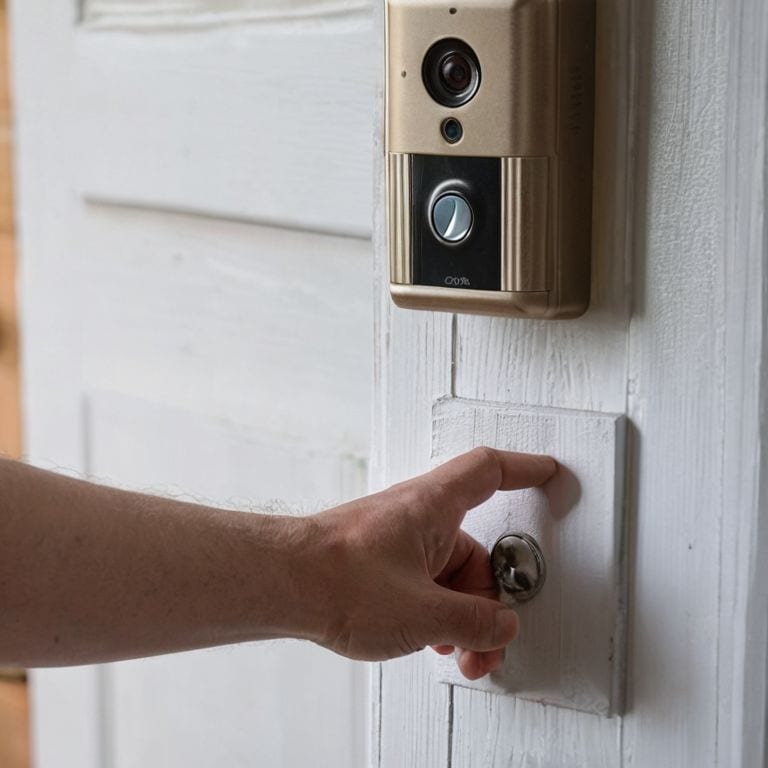
Wireless Wonders Smart Doorbell Camera Installation
As I delicately place my vintage teapot, “Emily,” on the porch table, I’m reminded of the charm that awaits us with our smart doorbell’s camera installation. This clever device will capture the stories of our daily visitors, from the mailman’s cheerful smile to the surprise visits from loved ones. With a simple screwdriver and a few gentle adjustments, the camera will be nestled into its new home, ready to whisper tales of its own.
The soft glow of the camera’s LED light will be like a warm welcome, inviting all who approach to leave their mark on our little corner of the world. As I step back to admire our handiwork, I’m filled with the same sense of wonder that I feel when I’m curled up in my “Heathcliff” room, surrounded by the musty scent of old books and the promise of new stories waiting to be told.
Doorway Delights: 5 Enchanting Tips for a Seamless Smart Doorbell Installation
- Measure Magic: Before you begin, ensure you measure your doorframe to select the perfect smart doorbell size, allowing it to blend harmoniously with your home’s facade
- Wireless Wisdom: Choose a wireless smart doorbell for a clutter-free installation, but remember to check the device’s Wi-Fi connectivity and range to avoid any pesky dead zones
- Power Play: Verify your smart doorbell’s power requirements, opting for a battery-powered model for ease of installation or a wired one for uninterrupted performance, depending on your home’s electrical layout
- Mounting Mastery: Select the ideal mounting spot for your smart doorbell, considering factors like weather resistance, motion detection, and the camera’s field of view to capture every visitor’s smile
- Testing Tales: Once installed, test your smart doorbell thoroughly, checking its video quality, motion detection, and notification features to guarantee it’s working in perfect harmony with your home’s unique rhythm
Timeless Treasures: 3 Key Takeaways for a Magical Smart Doorbell Installation
I’ve found that a smart doorbell can be a charming addition to our homes, much like a vintage teapot on a cozy afternoon, by providing an extra layer of security and modern convenience
Ensuring a seamless smart doorbell installation involves carefully considering the power requirements, much like selecting the perfect blend of tea to complement the ambiance of my ‘Heathcliff’ study
By embracing the whimsy of smart home technology, we can transform our entryways into welcoming spaces that whisper stories of warmth and hospitality, much like the inviting glow of a well-designed ‘Elizabeth Bennet’ drawing room
A Door to Enchantment
As we hang our smart doorbell, let us remember that it’s not just a device, but a guardian of our home’s story, a whisperer of welcomes, and a watcher over the memories we create within these walls.
Margaret Silva
A Warm Welcome: Conclusion
As we conclude our journey of installing a smart doorbell, let’s take a moment to reflect on the key points we’ve covered. From the initial introduction to the step-by-step guide, and through the subsections on Wireless Wonders and Powering Enchantment, we’ve explored the world of smart doorbells with a focus on creating a welcoming and enchanting entryway. By following these steps and considering the unique aspects of your home, you’ve not only enhanced your home’s security but also added a touch of modern magic to your front porch.
Now, as you step back to admire your handiwork, remember that the true beauty of home styling lies in the stories we tell through our spaces. Your smart doorbell is more than just a device; it’s a character in the narrative of your home, waiting to welcome whispers of loved ones and strangers alike. As you continue to craft your living story, I invite you to join me in the next chapter of our home styling journey, where we’ll uncover more secrets to turning our houses into homes that echo with warmth, wonder, and the gentle charm of vintage treasures.
Frequently Asked Questions
What are the most common issues that can arise during smart doorbell installation and how can I troubleshoot them?
Don’t worry, my friend, for even the coziest of installations can hit a snag. Common issues include connectivity problems, poor video quality, or faulty motion detection. To troubleshoot, try restarting your device, checking your WiFi signal, or adjusting the camera’s angle. If all else fails, consult your trusty user manual or reach out to the manufacturer’s support team for a helping hand.
Can I install a smart doorbell if I have an existing traditional doorbell, and what are the steps to integrate the two?
Absolutely, dear! You can indeed install a smart doorbell alongside your traditional one. Simply replace the existing doorbell with the smart one, and keep the traditional chime box intact. Then, follow the manufacturer’s instructions to wire the smart doorbell to your home’s electrical system, and voilà! Your traditional doorbell will continue to chime, while the smart doorbell’s camera and features come to life.
How do I ensure that my smart doorbell's Wi-Fi connection is stable and secure to prevent any disruptions or hacking attempts?
To keep your smart doorbell’s Wi-Fi connection stable and secure, I recommend placing your router in a central location, using a strong and unique password, and enabling WPA2 encryption – just like locking a treasure chest in my ‘Heathcliff’s Hideaway’ study, don’t you think?